Overnight Bread Recipe: How 7 Steps Turn Dough to Magic
Table of Contents
Overnight Bread Recipe
Have you ever wondered how bakeries achieve that perfect crusty exterior and airy interior in their artisan loaves? What if I told you the secret isn’t expensive equipment or professional training, but simply time?
Creating an overnight bread recipe might seem intimidating at first, but it’s actually one of the most forgiving methods for home bakers. The long fermentation process does most of the work while you sleep, resulting in complex flavors and perfect texture with minimal effort.
This easy overnight bread recipe will transform how you think about homemade bread, making it an accessible joy rather than a daunting task.
Ingredients List
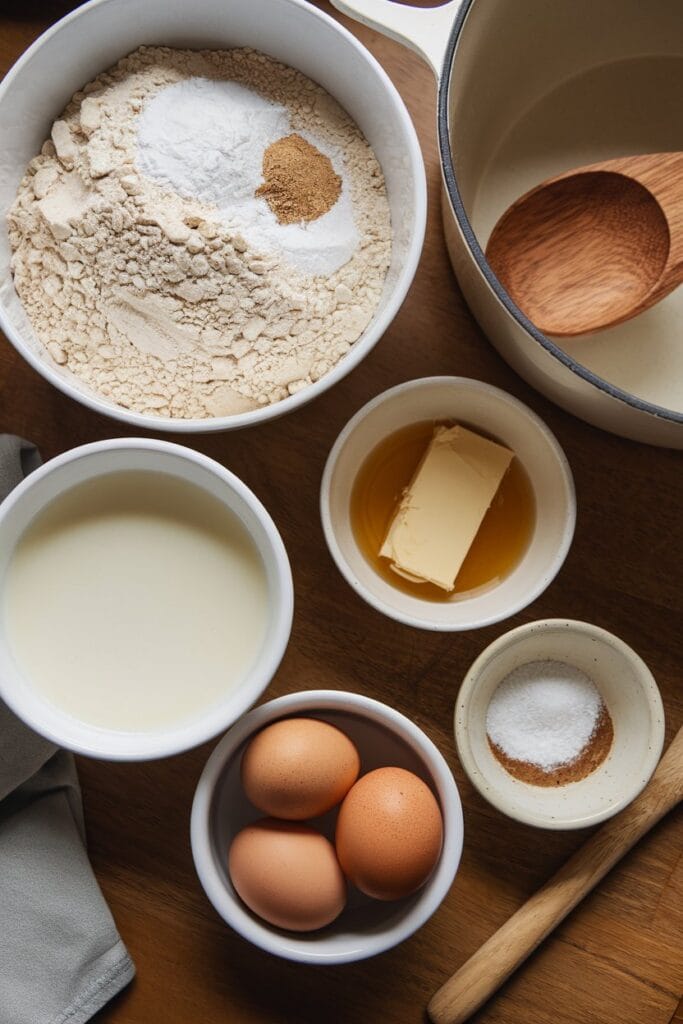
The beauty of this bread lies in its simplicity. Just a few basic ingredients transform into something extraordinary through the magic of time:
- 3½ cups (500g) all-purpose flour – You can substitute up to half with whole wheat flour for a nuttier flavor and more fiber
- 1½ teaspoons (9g) salt – Sea salt or kosher salt works best for enhanced flavor
- ¼ teaspoon (1g) instant yeast – Active dry yeast works too, but may need to be proofed first
- 1½ cups (350ml) water – Filtered water at room temperature yields best results
The minimal yeast amount might surprise you, but it’s intentional – the slow fermentation allows even this small amount to work its magic overnight.
Timing
Prep time: 15 minutes (active work)
Fermentation time: 12-18 hours (overnight, hands-off)
Second rise: 1-2 hours
Baking time: 45-50 minutes
Total time: 14-20 hours (with only about 30 minutes of active work)
While the total time seems long, your actual hands-on involvement is just 5% of the process – significantly less effort than traditional bread recipes that require extensive kneading and multiple rises.
Step-by-Step Instructions
Step 1: Mix the Dry Ingredients
In a large mixing bowl, whisk together the flour, salt, and instant yeast until well combined. This ensures even distribution of the yeast and salt throughout the dough, preventing any concentrated pockets that might affect fermentation.
Step 2: Add Water and Form Initial Dough
Pour in the room temperature water and stir with a wooden spoon or spatula until a shaggy, sticky dough forms. The mixture will look rough and uneven – this is perfect! Don’t worry about achieving a smooth dough at this stage; overworking can develop too much gluten too soon.
Step 3: Cover and Let Ferment
Cover the bowl with plastic wrap or a damp kitchen towel and let it sit at room temperature (around 68-72°F or 20-22°C) for 12-18 hours. During this time, the overnight bread recipe develops its complex flavor through slow fermentation.
Step 4: Shape the Dough
When ready, the dough surface will be dotted with bubbles. Lightly flour a work surface and gently scrape the dough onto it. With floured hands, fold the dough over itself just 2-3 times to create tension. Don’t knead it – we want to preserve those beautiful air pockets.
Step 5: Second Rise
Place the dough seam-side down on a piece of parchment paper. Dust with flour and cover loosely with plastic wrap or a kitchen towel. Let it rise for 1-2 hours until nearly doubled in size. Meanwhile, place your Dutch oven with lid in the oven and preheat to 450°F (230°C) for at least 30 minutes.
Step 6: Score and Bake
When the dough is ready, carefully score the top with a sharp knife or razor blade to allow for expansion. Lift the parchment with the dough and gently lower it into the preheated Dutch oven. Cover with the lid and bake for 30 minutes.
Step 7: Finish Baking
Remove the lid and continue baking for another 15-20 minutes until the bread is deeply golden and sounds hollow when tapped on the bottom. The internal temperature should reach about 205°F (96°C) for perfect doneness.

Nutritional Information
This overnight bread recipe yields approximately 12 servings per loaf, with each serving providing:
Per Serving (approximate):
- Calories: 120
- Carbohydrates: 25g
- Protein: 4g
- Fat: 0.5g
- Fiber: 1g
- Sodium: 150mg
Compared to store-bought artisan bread, this homemade version typically contains 30% less sodium and no preservatives or dough conditioners, making it a cleaner option for health-conscious bakers.
Healthier Alternatives for the Recipe
While this bread is already quite wholesome with simple ingredients, here are some modifications to boost its nutritional profile:
- Whole grain variation: Replace up to 50% of the all-purpose flour with whole wheat, spelt, or rye flour for increased fiber and nutrients. Add an extra 2 tablespoons of water to compensate for the higher absorption.
- Seed-packed version: Add ¼ cup each of sunflower seeds, pumpkin seeds, and flaxseeds for omega-3 fatty acids and additional protein.
- Reduced sodium: The salt can be reduced to 1 teaspoon without significantly affecting the flavor, cutting sodium content by about 33%.
- Sourdough adaptation: Replace the instant yeast with ½ cup of active sourdough starter for improved digestibility and lower glycemic impact.
Serving Suggestions
This versatile bread shines in numerous settings:
- Breakfast delight: Toasted and topped with avocado, a poached egg, and microgreens for a nutrient-dense start to your day.
- Soup companion: Tear into chunks and serve alongside roasted tomato soup or hearty stews to soak up every last drop.
- Bruschetta base: Slice, toast, rub with garlic, drizzle with olive oil, and top with diced tomatoes and basil for an elegant appetizer.
- Sandwich foundation: The sturdy crumb holds up beautifully to hearty fillings without getting soggy, making it perfect for packed lunches.
- Cheese board essential: Pair with aged cheeses, honey, and fresh fruit for a simple yet sophisticated offering.
Common Mistakes to Avoid
- Using hot water: Water above 115°F (46°C) can kill the yeast. Stick to room temperature water for optimal fermentation.
- Overworking the dough: Excessive handling destroys the delicate air pockets. The minimal handling in this overnight bread recipe is intentional.
- Skipping preheating: A properly preheated Dutch oven creates the steam environment crucial for a crispy crust. Allow at least 30 minutes of preheating.
- Opening the oven too early: Resist the urge to peek during the first 30 minutes of baking, as this releases the steam necessary for crust development.
- Cutting into hot bread: Slicing too soon releases moisture and can make the texture gummy. Allow at least 1 hour of cooling time.
- Storing in plastic: This softens the crisp crust. Store cut-side down on a cutting board or in a paper bag for the first day.
Storing Tips for the Recipe
Your freshly baked bread deserves proper storage to maintain its quality:
- Day 1-2: Store at room temperature, cut-side down on a cutting board or in a paper bag. The crust acts as a natural preservative.
- Day 3-5: Transfer to a bread box or loosely wrapped in a clean kitchen towel. Avoid plastic bags which trap moisture and soften the crust.
- Beyond day 5: Slice and freeze in an airtight container with parchment paper between slices for easy toasting. Frozen bread maintains quality for up to 3 months.
- Refreshing stale bread: Sprinkle with water and heat in a 350°F (175°C) oven for 5-10 minutes to restore crispness.
For make-ahead convenience, you can refrigerate the dough after the initial rise for up to 3 days, which actually enhances flavor development further.
Conclusion
This overnight bread recipe transforms simple ingredients into bakery-quality artisan bread with minimal effort. The long fermentation process not only creates exceptional flavor and texture but also makes bread-making accessible to even the busiest home cooks.
The beauty of this method lies in its flexibility – once you master the basic technique, you can experiment with different flour combinations, add-ins, and shapes to create your own signature loaves.
Have you tried this overnight method before? I’d love to hear about your bread-making adventures in the comments below! And if you make this recipe, please share your results or any creative variations you discover. Happy baking!