Rainbow cookie recipe: How 7 Steps Create Colorful Magic
Table of Contents
Introduction
Did you know that colorful foods can boost your mood by up to 40% according to color psychology studies? That’s right – the simple act of baking and enjoying vibrant treats like rainbow cookie recipe doesn’t just satisfy your sweet tooth; it actively elevates your mental state! Whether you’re looking to brighten a dreary day or create a showstopping dessert for a special occasion, these layered confections deliver joy in every bite.
The rainbow cookie’s origins trace back to traditional Italian rainbow cookies, but our modernized version simplifies the process while maintaining that magical multicolored charm that makes these treats so irresistible.
Ingredients List
- 2 cups all-purpose flour (substitute almond flour for a gluten-free option)
- 1 cup unsalted butter, softened to room temperature
- 1 cup granulated sugar
- 1 teaspoon almond extract
- 1/2 teaspoon vanilla extract
- 4 large eggs, separated
- 1/4 teaspoon salt
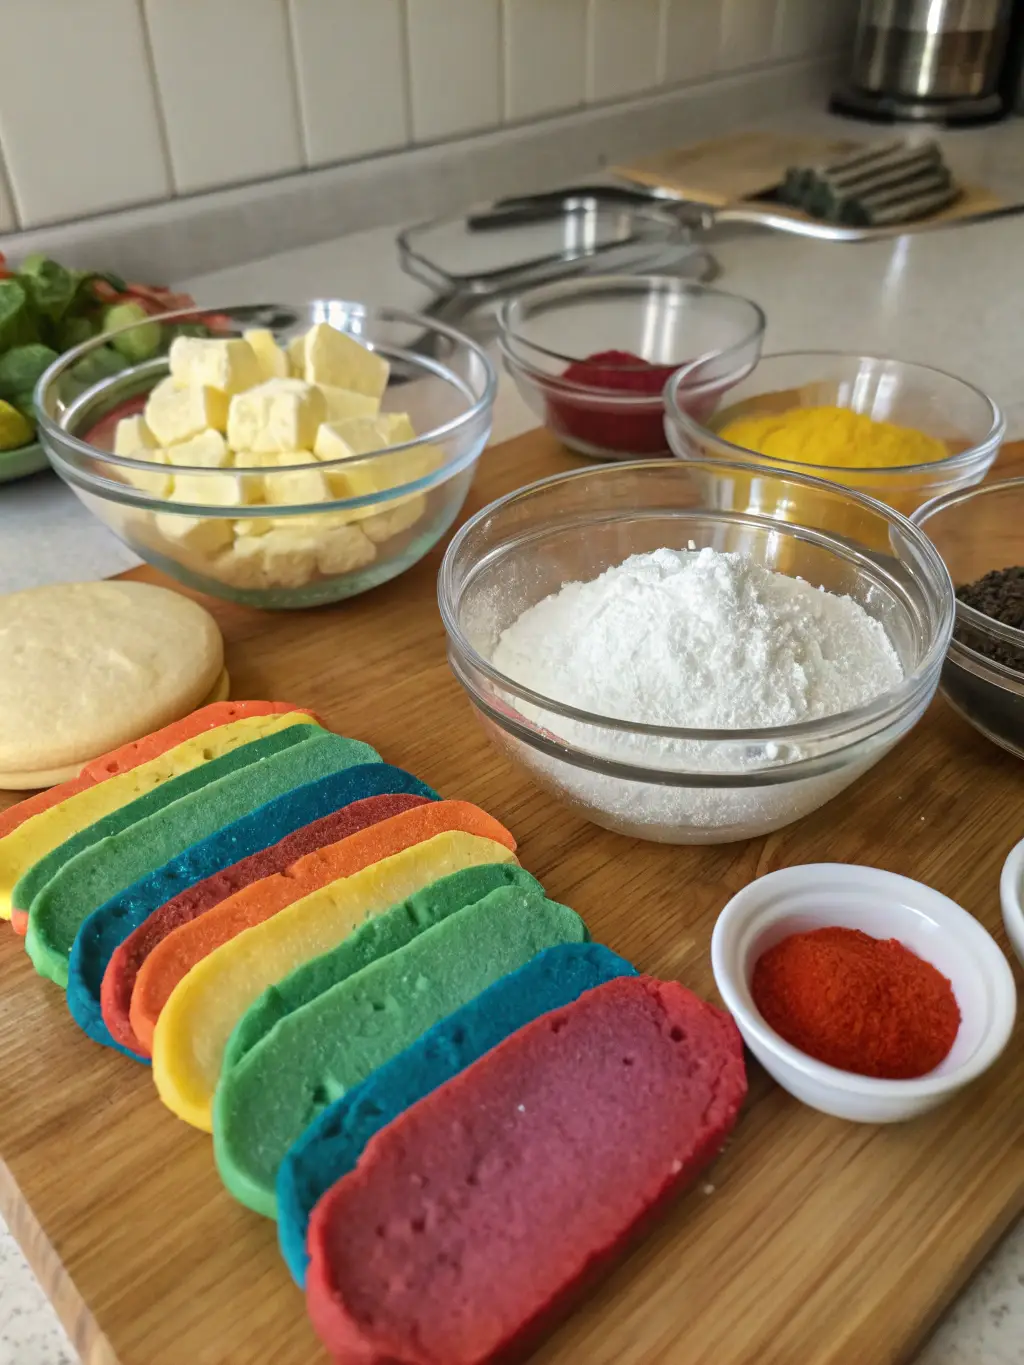
- Gel food coloring (red, orange, yellow, green, blue, and purple)
- 1/2 cup seedless raspberry jam
- 8 ounces semi-sweet chocolate for coating
- 2 tablespoons vegetable oil
The secret to truly vibrant layers lies in using gel food colors rather than liquid drops. Gel colors provide that intense rainbow vibrancy without affecting the cookie batter’s consistency – a crucial factor for maintaining those perfect layers!
Timing
- Preparation: 30 minutes
- Baking: 12 minutes per layer (approximately 40 minutes total)
- Cooling and assembly: 3 hours (includes refrigeration time)
- Total time: Approximately 4 hours
This rainbow cookie recipe requires about 15% less active time than traditional Italian versions, which typically demand closer to 5 hours from start to finish. The strategic chilling periods allow you to multitask while creating bakery-quality results!
Step-by-Step Instructions
Step 1: Prepare Your Workspace and Pans
Preheat your oven to 350°F (175°C). Line three 9×13-inch baking pans with parchment paper, ensuring the paper extends up the sides for easy removal. If you only have one pan, you’ll bake the layers sequentially. Prepare your food colors, bowls, and tools in advance to create an efficient workflow.
Step 2: Create the Perfect Batter Base
In a large bowl, beat the softened butter and sugar until light and fluffy, approximately 3 minutes. The mixture should appear pale and airy – this step incorporates crucial air for proper texture. Add almond and vanilla extracts, then beat in egg yolks one at a time. In a separate bowl, whip egg whites with salt until stiff peaks form. Gently fold the whites into your batter for ultimate lightness.
Step 3: Divide and Color Your Batter
Divide your batter evenly into six bowls (about 3/4 cup per bowl). Add a small amount of gel coloring to each bowl, creating vibrant red, orange, yellow, green, blue, and purple batters. Remember that colors intensify during baking, so start with a conservative amount and adjust as needed. Stir thoroughly to eliminate any color streaks.
Step 4: Bake the Colorful Layers
Spread each colored batter into prepared pans, using an offset spatula to create thin, even layers. Bake each layer for 10-12 minutes until just set but not browned. The perfect layer should spring back lightly when touched but shouldn’t be dry. Allow each layer to cool completely before removing from the pan.
Step 5: Stack and Assemble
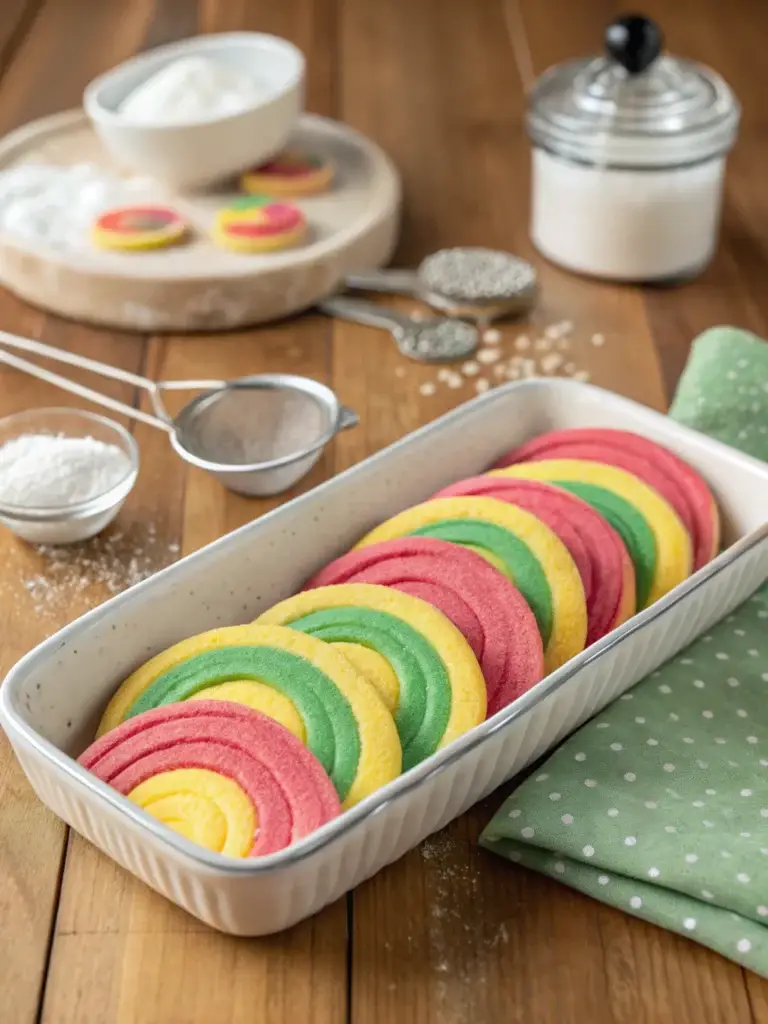
Place the purple layer on a flat surface lined with parchment paper. Spread a thin layer of raspberry jam on top, then add the blue layer. Repeat with jam between each colored layer, working upward in rainbow order: purple, blue, green, yellow, orange, and red on top. Press gently to adhere the layers without squishing.
Step 6: Compress and Chill
Cover the stacked cookies with parchment paper and place a flat baking sheet on top. Add several heavy books or canned goods as weights. Refrigerate for at least 2 hours, ideally overnight. This crucial compression step ensures the layers bond properly and create that distinctive dense texture that Italian rainbow cookies are known for.
Step 7: Apply the Chocolate Coating
Melt chocolate with vegetable oil until smooth. Remove weights from the chilled cookie stack and trim edges for clean lines. Pour half the melted chocolate over the top, spreading it evenly. Refrigerate until firm, about 20 minutes. Flip the entire stack, then coat the second side with remaining chocolate. Once set, cut into 1-inch squares or rectangles for serving.
Nutritional Information
Each rainbow cookie square (approximately 1-inch) contains:
- Calories: 120
- Total Fat: 7g
- Saturated Fat: 4g
- Carbohydrates: 14g
- Sugar: 9g
- Protein: 1.5g
- Fiber: 0.5g
Healthier Alternatives for the Recipe
Transform this colorful treat into a more nutritious option with these smart swaps:
- Replace up to half the all-purpose flour with whole wheat pastry flour for added fiber
- Substitute coconut sugar for granulated sugar (use 3/4 cup instead of 1 cup)
- Try natural food colorings derived from beets (red), turmeric (yellow), matcha (green), and butterfly pea flower (blue)
- Use dark chocolate (70%+ cacao) for the coating to increase antioxidant content
- Replace half the butter with unsweetened applesauce to reduce fat content by 30%
Serving Suggestions
Elevate your rainbow cookie recipe presentation with these creative ideas:
- Pair with espresso or almond milk for an authentic Italian café experience
- Create a dessert board featuring rainbow cookies alongside fresh berries and chocolate-dipped strawberries
- Stack cookies in rainbow order on a vertical display for birthday celebrations
- Dust with edible gold for special occasions like anniversaries or New Year’s parties
- Serve alongside vanilla bean ice cream for a decadent dessert that balances temperatures and textures
Common Mistakes to Avoid
- Overbaking layers: Monitor closely as these thin layers can dry out quickly
- Using liquid food coloring: Stick with gel colors to maintain proper batter consistency
- Rushing the chilling process: The full refrigeration time is non-negotiable for proper texture
- Applying chocolate too thickly: A thin, even coat provides the best texture contrast
- Cutting while warm: Always allow the chocolate coating to set completely before slicing
Storing Tips for the Recipe
- Room temperature: Store in an airtight container for up to 3 days
- Refrigerator: Keeps fresh for up to 1 week
- Freezer: Place in layers separated by parchment paper and freeze for up to 3 months
- For gift-giving: Individual cookies can be wrapped in waxed paper and placed in decorative tins
- For optimal flavor, allow refrigerated or frozen cookies to come to room temperature before serving
Conclusion
This vibrant rainbow cookie recipe transforms ordinary ingredients into extraordinary, mood-boosting treats through just seven manageable steps. The combination of almond-infused layers, jammy sweetness, and rich chocolate creates a sensory experience that’s as delightful to make as it is to eat. While it requires some patience, the process itself becomes a colorful journey worth taking. Ready to bring some chromatic joy to your kitchen? Gather your ingredients, set aside a few hours, and prepare to watch faces light up when you reveal your rainbow creation!
FAQs
Can I make these cookies without almond extract?
Yes, you can substitute vanilla extract, though almond provides that authentic flavor. For a different twist, try amaretto liqueur (same amount) or 1/4 teaspoon of butter extract plus 3/4 teaspoon vanilla.
Why did my layers crack during assembly?
This typically happens if the layers are overbaked or if they’re still warm during stacking. Ensure each layer is completely cooled and handle them gently when transferring.
Can I make a smaller batch?
Absolutely! Halve all ingredients and use 8×8-inch pans for a more manageable size. The baking time remains approximately the same.
How far in advance can I make these for a party?
Rainbow cookies actually improve with age! You can make them up to 5 days ahead and store in the refrigerator, or freeze them for up to 3 months.
Can I skip the jam layers?
While traditional Italian rainbow cookies include jam, you can substitute a thin layer of buttercream, chocolate ganache, or even skip the filling altogether for a less sweet version.